Why You Should Be Using WebP images
We all want websites to load faster so we can get our content fix. Aside from JavaScript, image sizes are one of the main culprits of slow-loading websites. Graphic designers and web developers have to balance image quality with loading speeds and are typically given the options of JPG, PNG or GIF files. Each file format has their advantage, JPGs can be compressed fairly well, PNG offers beautiful transparencies, and GIFs are best for small animations.
Enter WebP…
WebP images were introduced by On2 Technologies and have become popularized after Google acquired the company in 2010. WebP uses the same compression technology that is often used for online videos and is designed with the internet in mind. It can create lossy or lossless images with a much smaller file size than PNG or JPG. This powerhouse image format not only compresses really well, it also supports transparencies and animations.
WebP images have the .webp extension and is used extensively on high-traffic sites like Google, Apple and CNN. As of this post (1/2023), 6.5% of websites are using WebP. However, over the course of 2022, the usage has more than doubled, especially with content management systems such as WordPress supporting the file format.
Advantages of WebP
Smaller file size = faster loading websites
Simply put, it makes for a better user experience. Website visitors will leave a site if it takes too long to load. This makes WebP advantageous to the content-provider as well. Site speed affects search engine ranking. Keeping users engaged on your website will allow you to convert those views into tangible results.
Browser Compatibility
All the major modern browsers support WebP images (Chrome, Firefox, Safari, and Edge). Yes IE, I’m throwing shade at you.
Disadvantages of WebP
It’s mainly used for the internet
I wouldn’t call internet-only use a disadvantage per se. If you plan on using WebP for your print materials, a different image format will be more suitable for you. The file size for WebP format is limited to 16,383 pixels square — which is far more than what’s needed for internet use.
Saving a WebP file may take extra steps
For those who use older versions of Adobe Photoshop (23.1 and below), you will need to download a third-party plugin to save a WebP format. While newer versions of Photoshop (23.2 and up) can save WebP, the “Save As” command does not allow for encoding preview or the ability to save animations. You can also use image compression websites to save images into WebP format.
Saving Images as WebP
Using Photoshop (23.2 and higher):
- Go to File > Save As (or if you have a layered file, Save As Copy)
- Select WebP
- Select your compression level and click “Save”
You may also choose to drop your file into an image compression website such as Squoosh.app. This will allow you to preview the compression before you download the image.
Compression Comparison
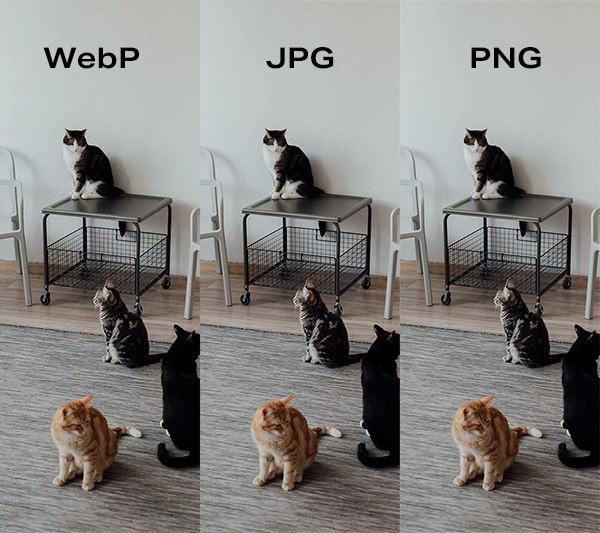
I opened an image into Photoshop and resized it to 534×800 pixels. Using the “Save for Web” function I saved it as a 24-bit PNG and a second time with JPEG with 75 quality. Here’s how they compare:
The photo used below is by Arina Krasnikova: https://www.pexels.com/photo/pet-cats-inside-the-house-7726306/
Saving as PNG resulted in a 614.2K file

JPEG compression was a little better at 127.6K.

WebP produced a much smaller file in comparison at 42KB when saved at 75% compression.

The images side-by-side showed visible results. Below is a lossless, non-enhanced image and you can see that while WebP has a smaller file size, the PNG is a lot more vivid and sharp.

Should You Use WebP?
For most cases WebP is the way to go, especially for websites where the quality of graphics is secondary to the content. The same image above, when saved as a lossless WebP file, is 72% of the PNG file size. Considering that most people are viewing websites on their mobile devices, your best bet to opt for a faster-loading website.
Leave a Reply